Routing Policies Overview
Routing policies automate the allocation of incoming leads, opportunities, accounts, contacts, and cases to appropriate individuals or teams based on predefined criteria. This automation streamlines processes, ensuring resources are allocated efficiently and accelerating conversion rates.
These policies monitor and categorize incoming items based on various criteria such as lead source, customer type, industry, case priority, or location. They then automatically assign them to qualified sales reps, customer success managers, or support teams according to predefined rules within the routing policy.
Note: Our policy execution will happen only on production plans along with supported GTMs exported for enabling the policy.
Fullcast Routing Policies
Fullcast Assignment Policies Automation provides a solid sales work plan by addressing the challenge of routing leads, opportunities, accounts, and cases to the correct teams and individuals. All assignment policies are equipped with a customizable routing engine aligned with your company’s GTM plan. The five available policies in Fullcast are:
- Account Routing: Account Routing assigns new accounts to the appropriate sales rep or team.
- Case Routing: When customers have issues or questions, case routing directs them to the most qualified sales rep or team.
- Contact Routing: Contact routing assigns new leads to the most relevant sales rep or team.
- Lead Routing: Lead routing is the distribution of potential leads to the most suitable sales rep or team.
- Opportunity Routing: Opportunity routing assigns potential deals within an account to the sales rep with the most relevant experience or territory.
Routing Stages in Fullcast
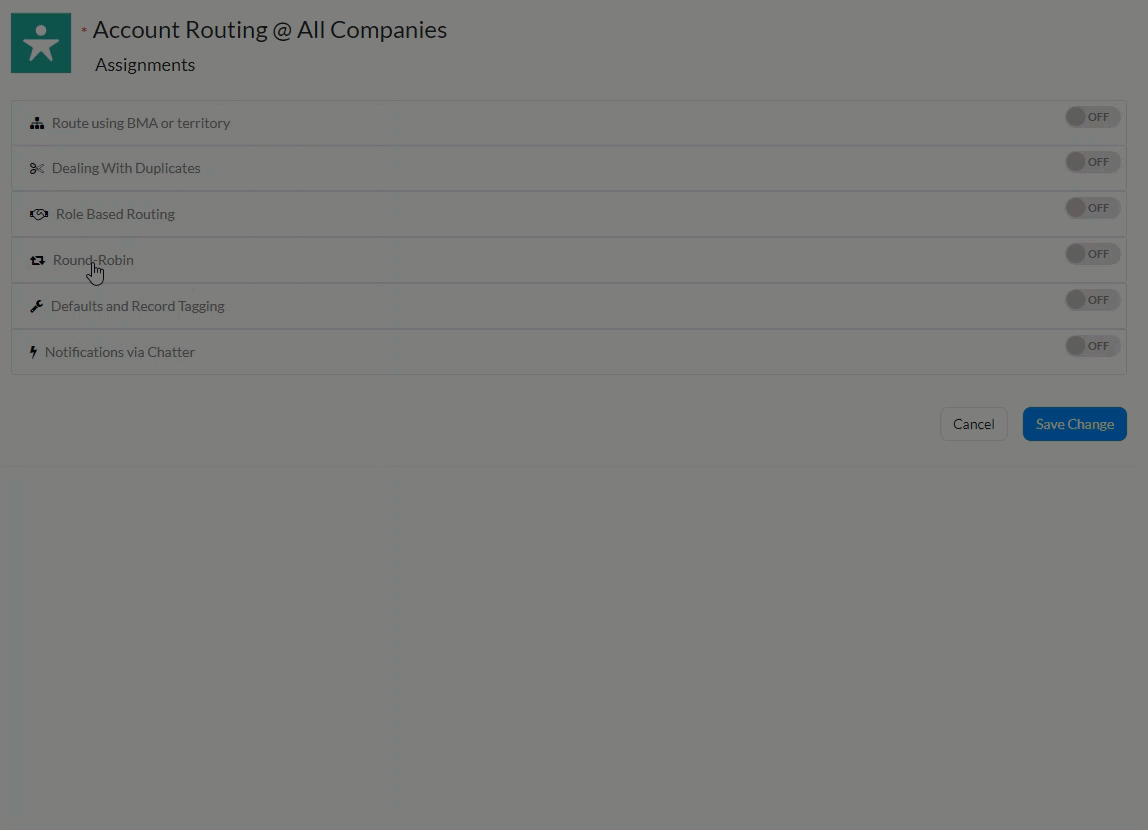
The routing process consists of several stages, each of which can be switched on or off based on specific requirements. General stages of routing include:
- Best Matched Account (BMA) or Territory
- Dealing with Duplicates
- Role-Based Routing
- Round-Robin
- Defaults and Record Tagging
- Notifications via Chatter
- Auto Convert
Note: Auto-convert stage is only available for Lead Routing.
Best Matched Account (BMA) or Territory

BMA uses a set of rules to identify the most appropriate account within a given dataset. If no account is found, routing defaults to territory-based routing. Essentially, if an account cannot be matched, the routing will rely on territory as the determining factor.
Note: If no account is found, routing will default to territory-based routing. This means that if an account cannot be matched, the routing will be based on territory. If you prefer not to route through the best-matched account, even if one is available, select the Ignore Best Matched Account even when available option.
Dealing with Duplicates

This stage allows you to define how duplicates are found and what actions to take.
To configure how the system handles duplicates:
- Click to enable Dealing with Duplicates.
- Define a time frame to locate duplicates and what to do if duplicates are found: Do nothing, route, or merge.
- Define what to do if duplicates from the same domain are found: do nothing, or route.
- Click Save Changes.
Note: Route Routes the record to the same owner of the original account.
Role-Based Routing

At this stage you have the option to route incoming leads to individuals in different roles within an existing account team. For instance, you can direct leads to a team if the company is a prospect, but route them to an account manager if the account is already a customer.
Note: Routing with BMA or Territory must be enabled in order for role-based routing to be configured.
To enable role-based routing:
- Enable the route using BMA or territory option.
- Enable the role based routing option.
- Select the applicable role for the What to do if the lead is not matched to an account but matched to a territory option.
- Click Save Changes.
Round-Robin
If you'd like to assign incoming cases to a team of sales reps, for instance, you can activate round-robin distribution to ensure equal workloads for your sales staff. This feature can be combined with any of the stages to optimize workload allocation across teams and roles.
Add Participants to Round-Robin:
- Enable Round Robin.
- Click to enable Participants.
Note: The Participants option is enabled by default.
- Select the appropriate team to add to the participants from the dropdown menu or one at a time by using the plus (+) icon.
- Exclude any individuals if applicable.
Once participants are selected, you can manage and specify certain fields to facilitate routing to specific individuals. If a person is assigned a higher value in the weightage column, they will receive more routed cases. The number of cases routed to an individual is determined by the weightage assigned to them in the weightage filed. If all individuals receive the same value, each person will receive an equal share of the leads.
Additionally, you can add a skill to filter against. For example, French-speaking sales reps can be assigned to cases based on French-speaking countries by adding “French” as a skill.
You can manage the vacation details of individuals by selecting the vacation start date and vacation end date from the corresponding columns.
The status column helps identify whether a particular person is active or inactive in handling a specific case.
If you want to set a limit on the number of cases routed to any participant, you can use the Limit column to do so. The limit can be set on an hourly, daily, or personal basis. Once the limit is reached for a particular person, the case will be routed to the next eligible person.

Additional configuration options in the round-robin stage provide more filtering criteria and facilitate easier routing execution..
You can opt to skip the round-robin stage when no matching skills are found by checking the corresponding box. This allows direct progression to Defaults and record tagging.
To manage a larger volume of cases, you can set a maximum limit on the number of cases distributed to each representative by checking the box labeled Limit the total number of cases routed to anyone to a maximum of…
Adding territories to your round-robin is similar to adding participants except that you have the ability to route to the person assigned to a specified role in each territory.

Defaults and Record Tagging

Defaults and record tagging instructs the system on the actions to take when no participant is found in any of the preceding stages. For example, in a round-robin scenario where three sales reps each have a maximum of 100 leads, if all of them already meet their limit, the system bypasses the round-robin process. In such cases, you can specify who will assume ownership of these leads if no participant is found in the earlier stages.
In addition to assigning an owner to the record, you can also apply specific values to certain fields on the record. The update the following fields option enables you to specify which fields to modify and assign values to them.
To configure defaults and record tagging:
- Click to enable the Defaults and Record Tagging option.
- Identify how the system routes an account, case, contact, lead, or opportunity by selecting the appropriate option from the dropdown menu and complete the required fields as applicable.
- Update fields by clicking the plus (+) icon.
- Select the appropriate field and corresponding value.
- Click to enable the Don’t update the owner field option if applicable.
Auto-Convert

Note: Auto-convert is only available for Lead routing.
Auto-convert entails the automatic conversion of leads into contacts. This functionality streamlines the process by transitioning leads to the next stage of the funnel based on your chosen criteria. For example, if a lead meets specific qualifications or interacts with particular content, the system can automatically convert it into a contact, or take no action, all without manual intervention.
To enable Auto-Convert
- Click to enable Auto Convert.
- Select the criteria: Account or Lead.
- Create your condition.
Note: Only one condition at a time is allowed.
- Identify what to do if no account exists: Do nothing, or create one.
- Click Save Changes.
Tags and Queue Operational Times
The tag field in routing policies directs items to specific queues, such as those based on lead source, geographical region, or industry. By using tag operators, you can create formula-based routing policies that efficiently match as many records as possible for better management.
Queue Operational Times essentially allows you to define times when the queue will be open and closed. By default, the queue is available at all times.
Additional Resources:
Configure Account Routing Policies in Fullcast