Creating and editing field/custom field values in the Entity
The purpose of this article is to provide information on creating and editing fields and custom field values in the Entity.
Notes:
- A full import job needs to be run after adding any field to Fullcast.
- Adding fields and some editing features are only possible in Standard Jobs not Custom Jobs.
- Create and Edit Field/Custom fields in the entity
Create and Edit Field/Custom Fields in the Entity
- Choose the Entity for which the field value has to be created.
- In the screen that appears, select the + icon on the right side to create a new field.

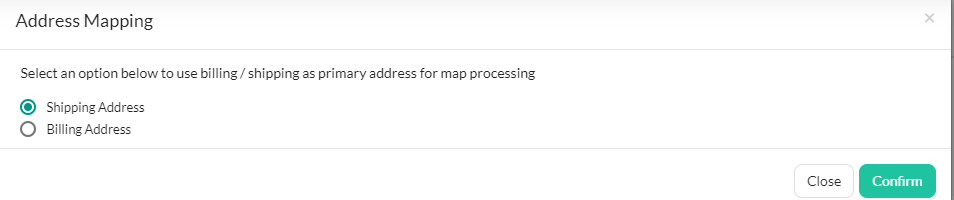
- For map processing, you can either select Billing address or shipping address from the tab Address Mapping. The default is shipping address. All the fields related to shipping address (Shipping country, shipping state, shipping city etc.,) will be included in the mandatory fields. Select whichever is applicable to you and click confirm and save.
- In the screen that pops up, start filling up the following for Source information:
- Type : From drop-down select the connection type as Salesforce
- Name: From the drop-down select the connection name - The name of the database that the tenant is connected to will be listed.
- Table: Select the appropriate table name from which data needs to be retrieved. (For Accounts - table name is Accounts, For people table name is people and so on)
- Column: Select the Column name which needs to be added from the drop-down menu.If you want to add a custom field, the field name has to be entered manually. The custom object column name will end with object name__c. If you are adding a field from another object then it should be formatted like ObjectName.Field API name. If it's a custom object then it would be ObjectName__c.Field API Name.
- Data Type: The data type will be automatically populated after the column is chosen.
- Known Column Type: This is an optional field. And it usually displays the non-mandatory fields of the entity.
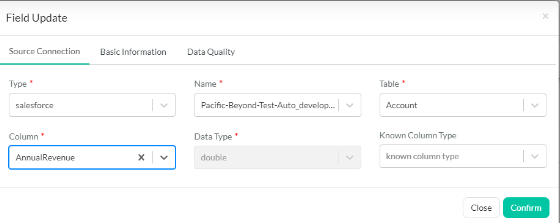
- Fill in these information, click confirm and hit save.
- It will take few minutes to configure the field and once the page gets refreshed, search for the field and click on the edit icon of the new field.
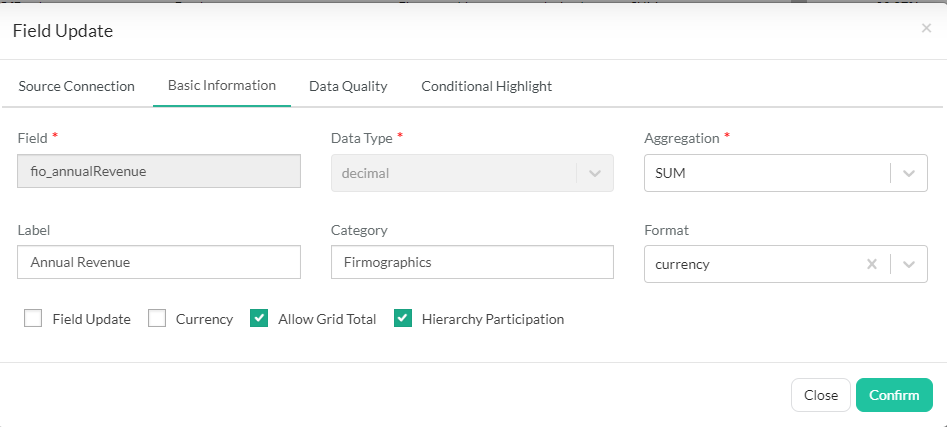
- Select the Basic information tab, and add any more information that you want for the particular field here.
- Field: Name of the field comes from Source connection
- Data Type: The data type is how the field is represented and it is pre-filled with the details given in Source connection.
- Aggregation: If the data type is string, then Aggregation is COUNT, if data type is decimal/integer then it is SUM. It is pre-filled data.
- Label: It is the value displayed in the grid and it is a pre-filled once the field value is entered.
- Category: User can categorize the field by giving a name here.
- Format: From the drop-down user can select the format in which he wants the field value to be displayed.
- Conditions: If the user prefers to highlight any particular field with particular value then input appropriate values for Conditional operator, Conditional value and Conditional CSS
Multiple values is not allowed in the Conditional value field. Please enter a single value.
The format for conditional CSS is "color":"red" , "backgroundcolor":"blue"
- Allow Update: When this box is checked, there will be an impact on Auto rerun rules whenever there is an update in this field.
- Currency: When this box is checked, all the fields which has currency as format will be displayed in USD or the currency value chosen by the Corporate in Manage currencies in Salesforce.
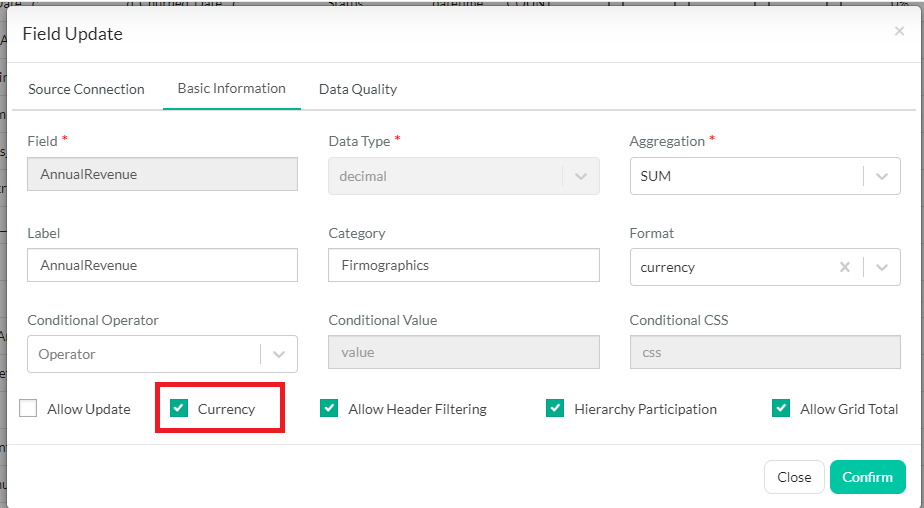
- Mandatory: The multicurrency flag needs to be enabled in salesforce for the standard package to import all the field values in the preferred currency format.
- If the field type value is currency, fullcast standard package will automatically recognize that the multicurrency flag is enabled.
- If the field value is decimal or double, and not currency but the user wants it to be displayed as currency, they can do it by updating the Field update --> Basic Information details in the entities and fields category and add currency to the format. Also note,if the field is not a double or decimal this will not work and the job may fail if field format was filled with value currency
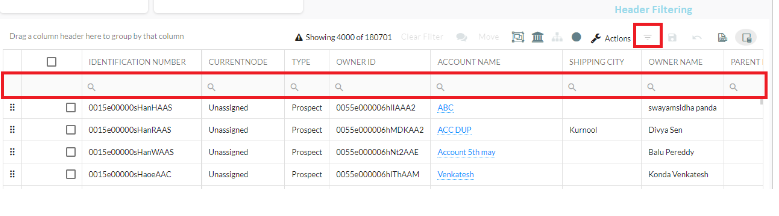
Allow Header Filtering: Checking this box enables the user to filter the records by searching a particular value in the header.
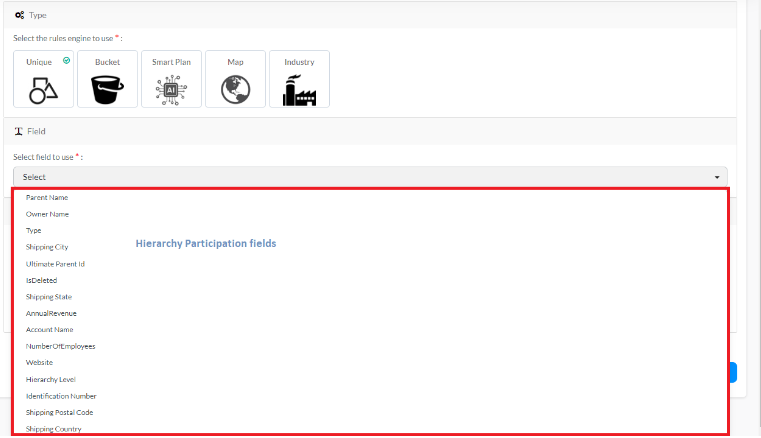
- Hierarchy Participation: Hierarchy create/edit fields drop-down is decided using this check box option.
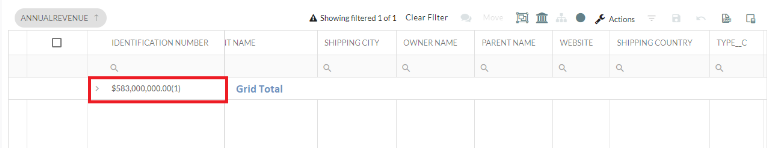
- Allow Grid Total: The user can choose this option if there is a need to know the total value for that field. Click Confirm and save.
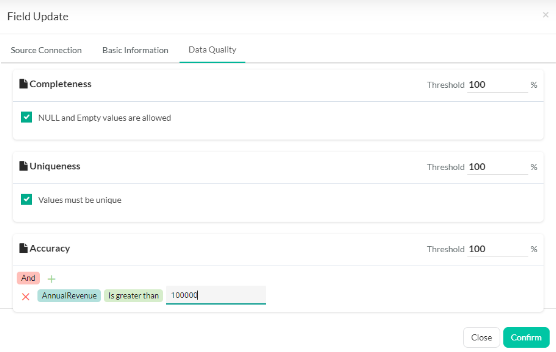
- The data quality tab shows a report on the quality of data and plans that are being considered based on the following three criteria.
- Completeness: Helps to highlight whether the field is empty or null. If you choose to allow the NULL and empty values, the data score value will be calculated accordingly.
- Uniqueness: The data score here helps to identify the uniqueness of the records. When you click on the "Values has to be unique" , it will calculate a score by finding the number of non-unique data available.
- Accuracy: Accuracy of the data is calculated giving a criteria. The data score is calculated after finding the number of records which satisfy the specified criteria. After setting all the values, click confirm and save.
After setting up the fields it is necessary to run the jobs. To know more on Import/Export jobs, click on the link.