Metric Settings
As a part of the onboarding process, your Business Partner will work with you to create and customize metrics by which you want to analyze your data. The metrics is created for the entities in the following three categories:
- Segments: Accounts, Opportunity, OpportunityLineitem
- Team: Accounts, Opportunity, OpportunityLineitem, People
- Products: OpportunityLineitem, Products
Adding Metrics
- Access your Fullcast instance and switch plans if applicable.
- Click the Settings icon (gear) in the navigation bar.
- Click the Metrics tab.
- Select the applicable tab: Segments, Teams, or Products.
- Click Add.
- Complete the form as outlined in the table below:
| Field | Description/Action |
| Name | Name of the metric. |
| Description | A brief description of the metric. |
| Prefix | A prefix symbol can be added to a metric to represent the entity behind it. For the open pipe (sales) metric, you would add a dollar sign. |
| Suffix | A suffix can be added to a metric to represent the unit behind it. |
| Is Currency | Identifies if the metric value is currency. |
| Is Timeseries | Identifies if the metric belongs to a timeseries. |
| Measures | Drag and drop measures from the list on the left. |
| Timeline | Drag and drop a date and time measure if applicable. |
| Filters | Drag and drop filter criteria. |
- Click Save.
- After the usual time taken for a configuration change (20 minutes), you can see the metric field added to the page. The name, description, prefix, and suffix can be edited on the screen if needed. But the measures cannot be edited.
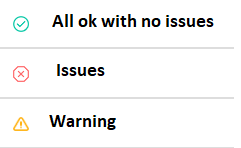
The symbols appearing in front of each metric row specify the following.
- When you click on these symbols, a popup with details about the issue appears.
- To delete the metric, click the delete icon (trashcan).
- The down arrow expands the row to give you more details about the measures, filter, and field used for the timeseries.
You can view these metrics in the territory module's metrics panel. For more information on viewing metrics in the territory module, refer to the article Summary Metrics.